October 2013

Jewelry Armoire Case glue-up

  • Posted on: 23 October 2013
  • By: Jay Oyster

About a week ago (it takes me a while to get these updates posted sometimes), I finally took a deep breath, and took the plunge. I started gluing together the case of the jewelry cabinet. I've posted photos here of the dry fitted case, but I took it apart last month and started sanding everything. I got all of the parts into a state that satisfied me, or at least I realized I was never going to get this done if I kept dawdling.  

Case after the glue up was complete. This is the back of the cabinet
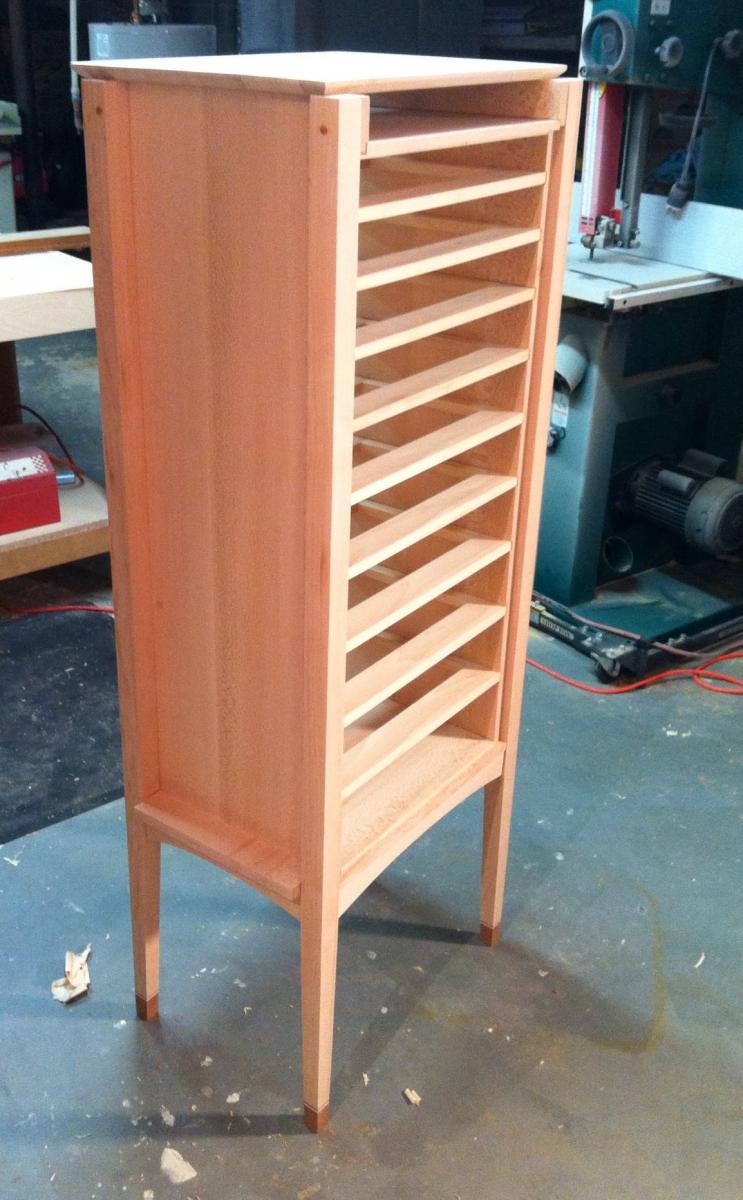
The glue-up went mostly as planned, with one hiccup. I had thought of pinning the top of each leg to the case wall using through cherry pins, but I realized that I needed more strength than that in the joint. So switched to drilling screw holes and screwing the tops of each leg to the case. In the front, the front legs only overlap the case by about 3/4", so the alignment needs to be pretty good. I missed.  One of the screws I thought i was screwing into the case, actually stuck out a bit on the front of the case. And unfortunately, I didn't see this until after the glue was dry.  So that one corner has no screw. The glue will need to hold instead.  The hole from the screw is very small and shouldn't be hard to repair. And it will also eventually be covered by the front doors of the cabinet.

Case front after the glue up

Liam's Playset in Florida

Liam's playset as completed, viewed from inside the backyard arboretum

I planned to use BORG pressure-treated lumber for the frame, and construction-grade non-pressure treated lumber for all of the parts up off of the ground (we had LOTS of termites in the soil in Florida) and where the boys would be touching the wood. I planned to buy BORG or other after-market hardware, such as swings, a slide, rock climbing wall grips, etc. Some of the other elements I planned to just build in place, like a little stair in one of the two towers, a balcony that looked out over the lake, and a sliding pole.

Final Sketchup design of the play set I planned to buildI did eight or nine versions in Sketchup, until I had something I liked, that my wife liked, and that I thought was practical to build. That work was done in March of 2009, when LIam was almost 3. Here's how the design ended up: 

The key elements I wanted to include:

  • Two towers, each two 'floors'
  • A bridge from the second floor of one tower to the other, also serving as the place to hand the swings
  • A slide off of one tower, with a ladder
  • An internal stair and balcony on the other tower. The stair would have a trap door at the top.
  • Flags and knobs using a colorful paint scheme
  • A pulley and bucket on the second tower
  • Green tarps to function as the rooves of the two towers


StartDate: 
Monday, March 1, 2010 to Saturday, August 14, 2010
Finished project?: 
Yes

Taking on a new project, my first since May. A built-in office cabinet

  • Posted on: 16 October 2013
  • By: Jay Oyster

I've resisted adding any actual, working projects to my woodworking portfolio for the past four months, as I worked on clearing my backlog and finishing things up. But I've now opted to create a built-in cabinet for my sister.  Design after client's first revisionShe and her husband are remodelling a room to be an office space for their growing business, and this was a perfect opportunity for me to try a built-in cabinet design. I guess this isn't really a designed-piece as much as it is an adaptation of someone else's design. I've wanted to build something fairly traditionally Shaker in style, so I used a design by Christian Becksvoort as the basis for this piece.  The office is a converted milk house, with a tile wall on one side, and regular sheet rock on the other three. 

I've spent about 10 hours coming up with a Sketchup design of how I would build it. I started with a basic block shape of where it might go, but then I went into virtual building mode. The model includes the anchor frames for the floor, wall, and ceiling to which the unit will be attached. And the joinery of the piece is largely finalized in the Sketchup design, half based on Mr. Becksvoort's choices, but also based on the uniqueness of the install location.

Holly's Office Cabinet

Rev 1D Design as Sketchup render

2013-10-05 Design Notes: Holly requested a wood finish rather than paint, with a mid-range wood color ( not maple-white, or walnut-dark) and that it fits into the Northwest corner of the office. This, as can be seen from the gallery photos, is an area that is 60" from a door in the wall to the corner, and then 60" over from that corner to a large window in the North wall. After some discussion, I suggested that we just build on one wall, since the corner storage would largely be lost if we built on both walls of such a short area. We'd end up with two 25" cabinets on each wall, with a 25" dead space in the corner, which would take up 50% more space for no extra usable storeage. So I designed along one wall, the West wall. As for the design type, she left it pretty much up to me. Sweet.

2013-10-11 Design notes: As a design influence, I looked at quite a few built-in cabinet designs, but I ended up opting for something similar to what Chris Becksvoort described in his Fine Woodworking article on building a Shaker style built-in from 2011. ("Beautify Your Home with a Shaker Built-In" which is available online with a subscription, Issue #211.)   I modified the design quite a bit to fit the space, but I used the basic construction strategy, including building it from floor to ceiling, and the materials choices (cherry plywood and solid cherry face frames and drawer fronts. One major change I had to make due to the context is that the wall behind the unit is a 50 year old ceramic tile block wall, with limited possibilities for anchoring. So I added anchors to the side wall and ceiling. The Rev 1C design is pretty close to what my sister endded up chosing. Rev 1D replaced the left top cabinet doors with more bookshelves. Rev 1D also added a face frame to the side of the unit, something I had intended all along, but hadn't taken the time to add in the 1C version.

2013-10-16 Design notes: In the model, I placed the side frame. I was going to make it a simple faux, two panel up and down side frame, but I opted instead to match the front panel dimensions, and made it a three panel side frame. The horizontals match the similar eliments on the face frame.

StartDate: 
Sunday, October 6, 2013
Finished project?: 
No

Workbench update: Finally got last leg glued up

  • Posted on: 15 October 2013
  • By: Jay Oyster

After flattening the top in August of 2012, I thought I was home free. I glued up three of the four leg laminations in another couple weeks . . .and then I tried the fourth leg.  That damned thing blocked me from progress for over a year. (Well . . . I also put this project on the back, back burner as I tried to finish up about 10 other projects I had started and half finished at that point.)  I've since cleared my backlog and am down to only three projects to work on . . .each large. So I'm working the jewelry armoire, the workbench, and the tool brackets for my wallmounted tool cabinet. I finished the first of the four large outstanding projects last month when I put the finishing touches on my chopsaw station. 

So I'm making progress on both the jewelry cabinet and finally, this past weekend, the workbench. It took me spending about an hour tweaking the hardware setup on my Jet 6" jointer, which hadn't been working right for over two years. But finally, after really reading the manual and taking the time to make sure everything was set up correctly, it suddenly started doing what it was supposed to . . . .flatten the faces of 5 1/2" wide bench leg boards.  Within a couple more hours, I had the final leg glued and in clamps.

Four legs for the workbench glued up, along with the purchased hardware

Jewelry Armoire - Finally took the plunge, glue-up

  • Posted on: 15 October 2013
  • By: Jay Oyster

Jewelry case assembly glued and in clamps (the final clamp arrangement changed slightly from this photo)On the jewelry cabinet project, I've been staring out a pile of parts for about a month now, trying to get the sanding done before I take the big step of gluing the case assembly. I finally finished sanding the case parts to my satisfaction this past Sunday, and glued the case up Sunday night. I opted to sand rather than trying to finish plane my case for two reasons.

  1. I'm still not very confident in my final planing proficiency to trust a good piece to it
  2. The quarter sawn sycamore is VERY prone to tear out, as I've discovered. So sanding seems like the safer choice.

That said, I've sanded all the case parts to 220, and then glued the case together. This presented a certain stress halfway through, when I realized that I do not, in fact, own enough long clamps to clamp all four corners of a case assembly. I ended up clamping the two sides in the middle using my two long pipe clamps, and used shorter clamps across the assembly to reinforce the side-to-side structure, although little force was needed here, since the top and bottom case pieces are attached with through tenons which do tend to prevent outward motion of the sides. :-) I did manage to verify the squareness of the assembly before the glue set, although only barely before it set.

Book Review: Timber Frame Construction by Jack Sobon and Roger Schroeder

  • Posted on: 15 October 2013
  • By: Jay Oyster

Review of "Timber Frame Construction: All About Post-and-Beam Building" by Jack Sobon and Roger Schroeder. Reviewed on October 15th, 2013. 

Timber Frame Construction cover artMost of the woodworking projects I've taken on over the years have been small projects or pieces of furniture, but I've also had a habit of building in a pseudo-beam construction manner.  Growing up on an Ohio farm, we always had a few extra beams or pieces of construction lumber around, and I would sometimes build little contraptions using screws and nails and other found hardware.  Aside from a grandfather clock I built at 17 from a kit, my first real piece of self-designed 'furniture' was a loft for my bedroom, built the summer before I left for college. And it was not a thing of beauty. I wanted a way to put my bed up high with a desk underneath to increase the usable space in my bedroom. Such things are common these days, but in the 1980s, they were still fairly rare.   Anyway, I built it simply by buying Home Depot lumber, some constuction grade, other pressure-treated landscaping timbers. I didn't really know the difference then.   And I built what could be charitably described as a post and beam loft. It even had little notches cut out of the 4x4 posts to accept the bed frame. I didn't know a lick about joints, so I didn't realize I was making half laps. But . . . it worked.  

While I was working on it in the garage, and had the thing roughly put together with bolts and a few screws, my Dad's construction handyman saw it and said, ' You know, not bad.'  He was being kind. It was strong enough for me to sleep on it, but it had a tendency to rack.  I used it for a few months before leaving for college, and when I came home for holidays for the next couple years. Eventually, it got broken up and used in other projects . . . mostly landscaping stuff around the farm.

The point of this little tale? I have a hankerin' for some traditional timber frame structures.