Woodworking Blog

This is the collection area of all of the writings I've made that pertain to woodworking in its various forms.

Paying for Sustainable is Good, but Expanding What's Acceptable is Better

  • Posted on: 1 November 2013
  • By: Jay Oyster

Bob Taylor and Alton Brown on the Alton Browncast, episode #18.There was an interesting crossover to woodworking in the latest Alton Brown podcast.  Yes, I like Alton Brown; he cooks, he's funny, and he's a geek. Don't give me any shit about it. I get enough on the topic from my wife. She can't stand him, for some reason.  So the Alton Browncast is normally about cooking and food related items, but in the last couple of weeks, he's branched out to talk about other topics that interest him. Episode 18 has him doing a 90 minute long interview with the founder of Taylor Guitars, Bob Taylor. It's a fascinating and wide-ranging discussion; they talk about the start of the business, ways to market your work, the production process, and food and diet, among other things. (Bob has just recently become a vegan, for health reaons.)  

Taylor Guitars emphasize the wood. This is from their promotional materialsBut from my perspective, the most interesting aspect of the interview came in the first half, from about the 20 minute to the 45 minute mark. Due to the recent legal difficulty at Gibson Guitars over improperly sourced exotic woods, it's clear that the entire industry has had to take a new look at their wood supplies. And it sounds as if Bob Taylor has done more than anyone to come up with a new way of suppling their factories with the woods they need.  If anyone is doing yeoman's work at pointing us all in a new sustainability direction in this area, it sounds like Mr Taylor is at the forefront. It's an interesting listen to hear him talk, with passion and thoughtfulness, about travelling around the world to find the finest woods for his production; to Alaska for Sitka spruce, to three small mountain villages in Honduras for rosewood, and to Camaroon for ebony.  It's the latter tale that has the most intrugue, and raised the biggest questions for me.

Jewelry Armoire Case glue-up

  • Posted on: 23 October 2013
  • By: Jay Oyster

About a week ago (it takes me a while to get these updates posted sometimes), I finally took a deep breath, and took the plunge. I started gluing together the case of the jewelry cabinet. I've posted photos here of the dry fitted case, but I took it apart last month and started sanding everything. I got all of the parts into a state that satisfied me, or at least I realized I was never going to get this done if I kept dawdling.  

Case after the glue up was complete. This is the back of the cabinetThe glue-up went mostly as planned, with one hiccup. I had thought of pinning the top of each leg to the case wall using through cherry pins, but I realized that I needed more strength than that in the joint. So switched to drilling screw holes and screwing the tops of each leg to the case. In the front, the front legs only overlap the case by about 3/4", so the alignment needs to be pretty good. I missed.  One of the screws I thought i was screwing into the case, actually stuck out a bit on the front of the case. And unfortunately, I didn't see this until after the glue was dry.  So that one corner has no screw. The glue will need to hold instead.  The hole from the screw is very small and shouldn't be hard to repair. And it will also eventually be covered by the front doors of the cabinet.

Case front after the glue up

Taking on a new project, my first since May. A built-in office cabinet

  • Posted on: 16 October 2013
  • By: Jay Oyster

I've resisted adding any actual, working projects to my woodworking portfolio for the past four months, as I worked on clearing my backlog and finishing things up. But I've now opted to create a built-in cabinet for my sister.  Design after client's first revisionShe and her husband are remodelling a room to be an office space for their growing business, and this was a perfect opportunity for me to try a built-in cabinet design. I guess this isn't really a designed-piece as much as it is an adaptation of someone else's design. I've wanted to build something fairly traditionally Shaker in style, so I used a design by Christian Becksvoort as the basis for this piece.  The office is a converted milk house, with a tile wall on one side, and regular sheet rock on the other three. 

I've spent about 10 hours coming up with a Sketchup design of how I would build it. I started with a basic block shape of where it might go, but then I went into virtual building mode. The model includes the anchor frames for the floor, wall, and ceiling to which the unit will be attached. And the joinery of the piece is largely finalized in the Sketchup design, half based on Mr. Becksvoort's choices, but also based on the uniqueness of the install location.

Workbench update: Finally got last leg glued up

  • Posted on: 15 October 2013
  • By: Jay Oyster

After flattening the top in August of 2012, I thought I was home free. I glued up three of the four leg laminations in another couple weeks . . .and then I tried the fourth leg.  That damned thing blocked me from progress for over a year. (Well . . . I also put this project on the back, back burner as I tried to finish up about 10 other projects I had started and half finished at that point.)  I've since cleared my backlog and am down to only three projects to work on . . .each large. So I'm working the jewelry armoire, the workbench, and the tool brackets for my wallmounted tool cabinet. I finished the first of the four large outstanding projects last month when I put the finishing touches on my chopsaw station. 

So I'm making progress on both the jewelry cabinet and finally, this past weekend, the workbench. It took me spending about an hour tweaking the hardware setup on my Jet 6" jointer, which hadn't been working right for over two years. But finally, after really reading the manual and taking the time to make sure everything was set up correctly, it suddenly started doing what it was supposed to . . . .flatten the faces of 5 1/2" wide bench leg boards.  Within a couple more hours, I had the final leg glued and in clamps.

Four legs for the workbench glued up, along with the purchased hardware

Jewelry Armoire - Finally took the plunge, glue-up

  • Posted on: 15 October 2013
  • By: Jay Oyster

Jewelry case assembly glued and in clamps (the final clamp arrangement changed slightly from this photo)
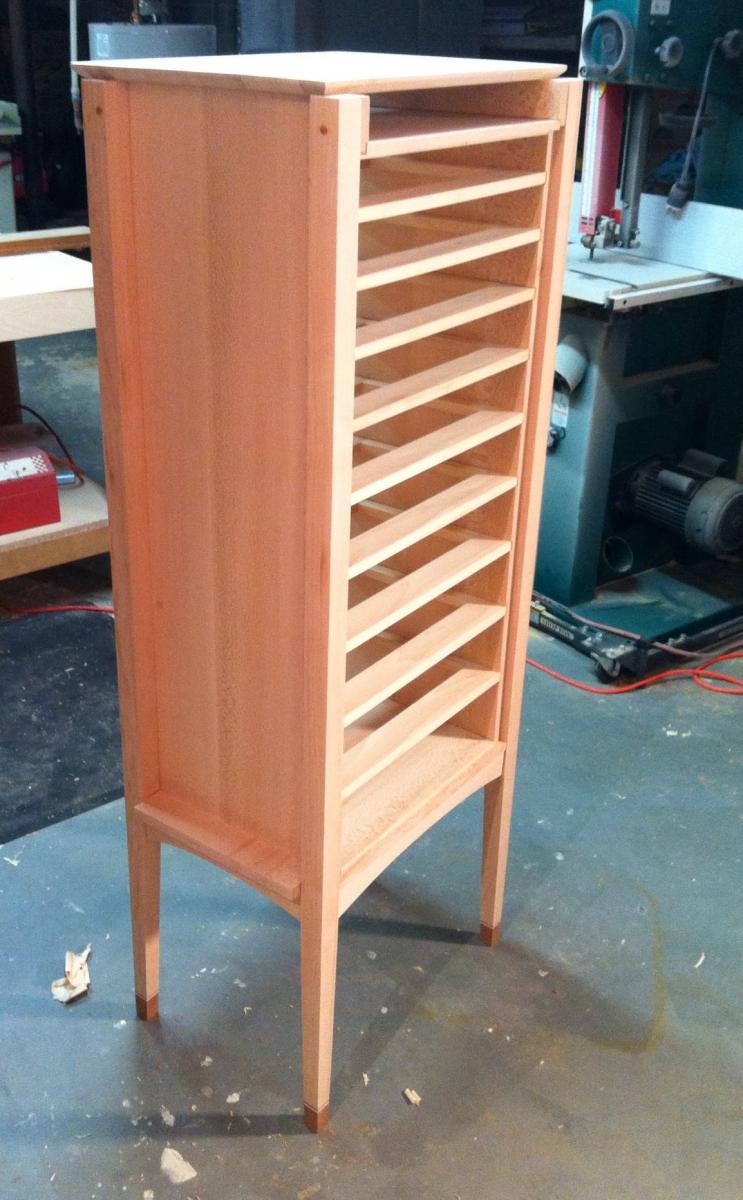
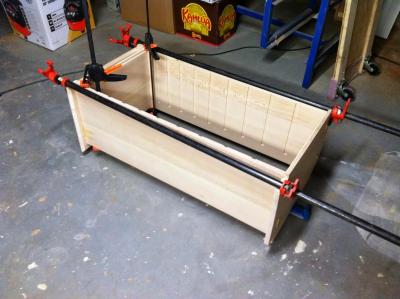
On the jewelry cabinet project, I've been staring out a pile of parts for about a month now, trying to get the sanding done before I take the big step of gluing the case assembly. I finally finished sanding the case parts to my satisfaction this past Sunday, and glued the case up Sunday night. I opted to sand rather than trying to finish plane my case for two reasons.

  1. I'm still not very confident in my final planing proficiency to trust a good piece to it
  2. The quarter sawn sycamore is VERY prone to tear out, as I've discovered. So sanding seems like the safer choice.

That said, I've sanded all the case parts to 220, and then glued the case together. This presented a certain stress halfway through, when I realized that I do not, in fact, own enough long clamps to clamp all four corners of a case assembly. I ended up clamping the two sides in the middle using my two long pipe clamps, and used shorter clamps across the assembly to reinforce the side-to-side structure, although little force was needed here, since the top and bottom case pieces are attached with through tenons which do tend to prevent outward motion of the sides. :-) I did manage to verify the squareness of the assembly before the glue set, although only barely before it set.

Book Review: Timber Frame Construction by Jack Sobon and Roger Schroeder

  • Posted on: 15 October 2013
  • By: Jay Oyster

Review of "Timber Frame Construction: All About Post-and-Beam Building" by Jack Sobon and Roger Schroeder. Reviewed on October 15th, 2013. 

Timber Frame Construction cover artMost of the woodworking projects I've taken on over the years have been small projects or pieces of furniture, but I've also had a habit of building in a pseudo-beam construction manner.  Growing up on an Ohio farm, we always had a few extra beams or pieces of construction lumber around, and I would sometimes build little contraptions using screws and nails and other found hardware.  Aside from a grandfather clock I built at 17 from a kit, my first real piece of self-designed 'furniture' was a loft for my bedroom, built the summer before I left for college. And it was not a thing of beauty. I wanted a way to put my bed up high with a desk underneath to increase the usable space in my bedroom. Such things are common these days, but in the 1980s, they were still fairly rare.   Anyway, I built it simply by buying Home Depot lumber, some constuction grade, other pressure-treated landscaping timbers. I didn't really know the difference then.   And I built what could be charitably described as a post and beam loft. It even had little notches cut out of the 4x4 posts to accept the bed frame. I didn't know a lick about joints, so I didn't realize I was making half laps. But . . . it worked.  

While I was working on it in the garage, and had the thing roughly put together with bolts and a few screws, my Dad's construction handyman saw it and said, ' You know, not bad.'  He was being kind. It was strong enough for me to sleep on it, but it had a tendency to rack.  I used it for a few months before leaving for college, and when I came home for holidays for the next couple years. Eventually, it got broken up and used in other projects . . . mostly landscaping stuff around the farm.

The point of this little tale? I have a hankerin' for some traditional timber frame structures. 

Design Influence - Patterns of Home

  • Posted on: 28 August 2013
  • By: Jay Oyster

Cover of Patterns of Home: The Ten Essentials  of Enduring DesignI've started reading "By Hand & Eye", the new book on furniture design by George Walker and Jim Tolpin, but I've not gotten more than a quarter of the way through it so far. When I finish it, I'll write up my reactions. But for now, my reaction is "Yes, I get it, proportions are important and you don't need a ruler."

I've been thinking about the multi-faceted aspects of design lately, particularly as it pertains to architecture and object creation (i.e. furniture or small woodworking projects.) I've realized more and more in recent months that most of my perspective on what is good design and what isn't is related to a book that I bought and read about 10 years ago. It's called "Patterns of Home: The Ten Essentials of Enduring Design" and it's terrific. The ideas in that book have completely stuck with me and have deeply influenced many areas of creativity in my life.

So what is this book? "Patterns of Home: The Ten Essentials of Enduring Design" is by Max Jacobson, Murray Silverstein and Barbara Winslow, and is a condensed version of a much larger work from the 70s, a gigantic book called "A Pattern Language: Towns, Buildings, Construction". That earlier book, first published in 1977, is over a thousand pages in length and is legendary in the architecture world. I've never read the older book. I've only been exposed to the ideas through this later, more graphical Patterns of Home book. 

Blue Spruce has learned the Woodcraft Rule

  • Posted on: 16 August 2013
  • By: Jay Oyster

Blue Spruce Toolworks, One of the Best Custom Tool Creators in the U.S.At around 3pm Pacific time on Thursday, August 15th, Blue Spruce toolworks sent out an email telling its customers of a special summer sale it was holding on remainders and products with minor blemishes. I suspect that very soon after that message went out, Dave Jeske, the very nice owner of Blue Spruce learned the Woodcraft Rule. What is the Woodcraft Rule, you ask?  It has to do with marketing anything to woodworkers.  And to be clear, I have no knowledge that Woodcraft ever stated this rule explicitly, or even hinted that it's their official stance . . . they just epitomize it in stark relief with everything they do. The rule deals with three traits of the woodworking community:

Built doors for the chopsaw station case

  • Posted on: 15 August 2013
  • By: Jay Oyster

Over the past 3 or 4 days, I've managed to build doors to fit over the openings in the front of the case. These are only intended to keep dust out of the inside of the case. The doors are made up of scraps I had around the shop. The stiles are 3/4" poplar. The rails are 5/8" clear pine. (Yep, I didn't even bother thicknessing them to match.) The panel is just 1/4" baltic birch plywood. 

Case doors, glued up and sanded, waiting for hinges

Roughing out the door frame rails and stiles

  • Posted on: 8 August 2013
  • By: Jay Oyster

I started working on the rails and stiles for the door frames to cover the front of the chopsaw station shelves on Tuesday night. I don't usually get much time during the week to woodwork, but I'm taking time during the rainy summer days that are all-to-common this summer in Georgia to get this project finished.  At this point in the project my goal is to get something solid built as quickly as I can using the supplies I had on hand. (This latter point ended up being a missed goal, as I'll explain later.) So I opted for thin rails and stiles with a glued-in 1/4" birch plywood panel for strength, since the frame will be very slight. The good point about this is that it will make the doors lightweight.

Chopsaw Station door frames laid out for fitting

Banding the feet

  • Posted on: 5 August 2013
  • By: Jay Oyster

This past weekend was productive on several of my woodworking projects. On the jewelry cabinet, I managed to install the last part of the feet detail, namely the banding around the top of each cherry foot.  I had previous installed cherry veneers on the four sides of each leg, up to a height of about 2" from the floor.  While contemplating this foot detail, I had decided last month that I might as well add a little more refinement to the feet by adding a band around the top to better define the ankle. I had previously cut thin strips of cherry and maple to serve as banding. One piece about 20" long, cut down the length should serve to band all four feet. Or at least, I hoped it would.

I didn't document cutting the slots in the legs with photographs. i was too intent on making the recesses accurate without creating any blowout on the legs. This was a tricky operation, since the legs aren't square down near the floor, but are angled inward on two sides. I ended up cutting the top edge of the band recess with the table saw, very carefully spacing it on the crosscut sled. (I taped the boundary between the cherry veneer and the leg maple with blue tape to ensure no blowout on the back edge.)

Fitting the cherry and maple banding to the top of the feet on the armoire legs

Installed shelves

  • Posted on: 5 August 2013
  • By: Jay Oyster

After I decided to simplify the case, it was just a matter of picking the materials, cutting and fitting them to size. I used some ½" birch ply I had left over from another project to create the shelves.

Shelves added to the case

Tear down, sanding, and feet

  • Posted on: 26 July 2013
  • By: Jay Oyster

I've made some good progress on Adri's cabinet over the past two weeks. I started by taking the dry-fit assembly apart so I can do final sanding, finishing and glue up of those parts. Aside from finishing up a couple of tool fixtures for my wall-hanging tool cabinet, I managed to keep my focus solely on the cabinet for a change. So the plan was: take it apart, sand, and work on the legs so they'll be ready to accept a finish. I haven't quite finished the feet details, but that's almost done. Then I'll need to do a couple more hours of sanding before applying the finishes. I'm hoping to get to the case glue-up within the next couple of weeks. 

The boring bits

  • Posted on: 16 July 2013
  • By: Jay Oyster

I don't have any photos of this, but I have been making progress on my wife's cabinet. When last we left the story, I had dry-fit the case, legs and webframe. So now I've torn down the whole thing and begun prepping it for glue up. The extra complication is that I want to keep the QS sycamore as white as possible, but it will be right up next to cherry and maple parts. So I've decided to finish the case and webframe together as soon as I get it assembled, and finish the legs and other parts separately.

I did have a lot of tear-out in the sycamore when planing it, probably because I need new knives in my old Ridgid power planer. So now I'm paying the price 

Pages