Chopsaw Stations - Finished!
I've now officially finished another project. The chopsaw station is now done. This past Saturday, I sanded the doors, installed the hinges, and attached them to the case.

I've now officially finished another project. The chopsaw station is now done. This past Saturday, I sanded the doors, installed the hinges, and attached them to the case.
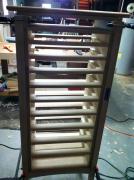
Over the past 3 or 4 days, I've managed to build doors to fit over the openings in the front of the case. These are only intended to keep dust out of the inside of the case. The doors are made up of scraps I had around the shop. The stiles are 3/4" poplar. The rails are 5/8" clear pine. (Yep, I didn't even bother thicknessing them to match.) The panel is just 1/4" baltic birch plywood.

I started working on the rails and stiles for the door frames to cover the front of the chopsaw station shelves on Tuesday night. I don't usually get much time during the week to woodwork, but I'm taking time during the rainy summer days that are all-to-common this summer in Georgia to get this project finished. At this point in the project my goal is to get something solid built as quickly as I can using the supplies I had on hand. (This latter point ended up being a missed goal, as I'll explain later.) So I opted for thin rails and stiles with a glued-in 1/4" birch plywood panel for strength, since the frame will be very slight. The good point about this is that it will make the doors lightweight.

This past weekend was productive on several of my woodworking projects. On the jewelry cabinet, I managed to install the last part of the feet detail, namely the banding around the top of each cherry foot. I had previous installed cherry veneers on the four sides of each leg, up to a height of about 2" from the floor. While contemplating this foot detail, I had decided last month that I might as well add a little more refinement to the feet by adding a band around the top to better define the ankle. I had previously cut thin strips of cherry and maple to serve as banding. One piece about 20" long, cut down the length should serve to band all four feet. Or at least, I hoped it would.
I didn't document cutting the slots in the legs with photographs. i was too intent on making the recesses accurate without creating any blowout on the legs. This was a tricky operation, since the legs aren't square down near the floor, but are angled inward on two sides. I ended up cutting the top edge of the band recess with the table saw, very carefully spacing it on the crosscut sled. (I taped the boundary between the cherry veneer and the leg maple with blue tape to ensure no blowout on the back edge.)

After I decided to simplify the case, it was just a matter of picking the materials, cutting and fitting them to size. I used some ½" birch ply I had left over from another project to create the shelves.

I've made some good progress on Adri's cabinet over the past two weeks. I started by taking the dry-fit assembly apart so I can do final sanding, finishing and glue up of those parts. Aside from finishing up a couple of tool fixtures for my wall-hanging tool cabinet, I managed to keep my focus solely on the cabinet for a change. So the plan was: take it apart, sand, and work on the legs so they'll be ready to accept a finish. I haven't quite finished the feet details, but that's almost done. Then I'll need to do a couple more hours of sanding before applying the finishes. I'm hoping to get to the case glue-up within the next couple of weeks.
I don't have any photos of this, but I have been making progress on my wife's cabinet. When last we left the story, I had dry-fit the case, legs and webframe. So now I've torn down the whole thing and begun prepping it for glue up. The extra complication is that I want to keep the QS sycamore as white as possible, but it will be right up next to cherry and maple parts. So I've decided to finish the case and webframe together as soon as I get it assembled, and finish the legs and other parts separately.
I did have a lot of tear-out in the sycamore when planing it, probably because I need new knives in my old Ridgid power planer. So now I'm paying the price
Well, I'm really working on Adriana's cabinet right now, so everything else has taken a backseat. But I did manage to create the two small drawers for the chopsaw station this past week. Nothing fancy, just birch ply face and 1/2" ply wides and back, and an 1/8" ply bottom. All rabbet jointed using the table saw. The right drawer is actually so closely fitted it really does have a piston effect on the air inside. I may need to drill a hole to let the air out when I'm closing it. (Nice! :-)

 After several weeks of cutting the mortise and tenon joints on the nine web frame drawer divders for Adriana's cabinet, I finally dry fit the whole thing to the case to see how it all works. It took some planing and tweaking to fit each one, but they're finally installed. This is still just a dry fit, I haven't glued anything on this piece yet. Part of that is just prudence, but the other part is simply fear. When I designed this piece, I didn't thinkit all the way through to detail and decoration, so the second I glue it all up, I'm locking myself out from any more changes.

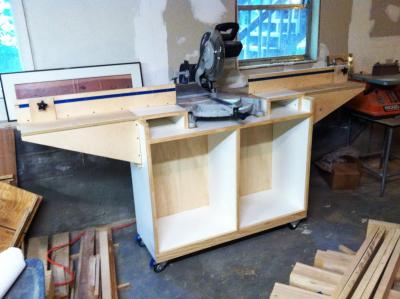 I made some good progress on the chopsaw station project the last few days. Last night I managed to get guides installed on the left and right wings of the stand, including stop blocks mounted in some T-track I just bought from Rockler. The Rockler track was convenient because I could stop at the Rockler store down on Roswell road on the way home from work to pick it up. But after buying it I noticed that it's made in Taiwan. I'm not sure but I think the Incra tracks are U.S. made.