Liam's Playset in Florida
Primary tabs

When my son was three, and we lived in Sarasota, Florida in our own house, I decided to make him a playset. I had seen those fancy wooden, multi-function playsets and loved the designs. A good example of these can be seen at CedarWorks and other companies that do semi-custom sets. But at $5,000 to $10,000 per set, this is one of the few projects I've taken on solely to attempt to save money. Plus, it was a good opportunity to do some custom design work.
We had a spot right behind the very large cage/arboretum that was attached to the back of our house that was used by the previous owner to build a large oblong koi pond. But the pond was algae filled and we were having trouble keeping the fish alive, since the filtration equipment was all at the end of its life. So, I had a truckload of dirt delivered to our house. It had to be dumped on our driveway, since there was no way to haul it around the sides of the house without tearing out a couple of propery-line fences. I literally hauled a truckload of sandy dirt from the front of our house to the back using one wheelbarrow, and a shovel. It took me several weeks of work to get it all moved, but eventually, we had a flat, packed earth plot where the koi pond had been.
And this is where I built a gigantic playset for my son Liam.
I planned to use BORG pressure-treated lumber for the frame, and construction-grade non-pressure treated lumber for all of the parts up off of the ground (we had LOTS of termites in the soil in Florida) and where the boys would be touching the wood. I planned to buy BORG or other after-market hardware, such as swings, a slide, rock climbing wall grips, etc. Some of the other elements I planned to just build in place, like a little stair in one of the two towers, a balcony that looked out over the lake, and a sliding pole.
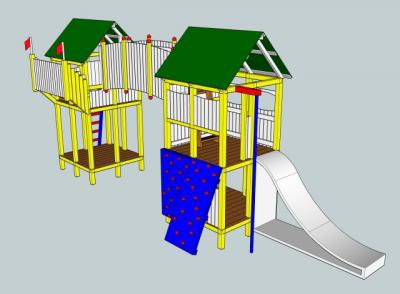 I did eight or nine versions in Sketchup, until I had something I liked, that my wife liked, and that I thought was practical to build. That work was done in March of 2009, when LIam was almost 3. Here's how the design ended up:
The key elements I wanted to include:
- Two towers, each two 'floors'
- A bridge from the second floor of one tower to the other, also serving as the place to hand the swings
- A slide off of one tower, with a ladder
- An internal stair and balcony on the other tower. The stair would have a trap door at the top.
- Flags and knobs using a colorful paint scheme
- A pulley and bucket on the second tower
- Green tarps to function as the rooves of the two towers
It turned out about 500% better than I had planned. The upstairs of the second tower ended up being very close to a stand of bamboo, so with that, and it's access either across the bridge or through a lockable trap-door, it felt exactly like the 'club-house' up there. This was the kind of clubhouse I always dreamed about having when I was a kid. And Liam (and later Lucas) were just starting to really enjoy playing on it, when I lost my job in Florida, and we were forced to sell this house, along with its fabulous playset in the depths of the Great Recession. Leaving this playset behind was just about the most wrenching part of that whole move.
I truly believe that this playset helped to sell our house in a dismal market, to a family with young children. I even offered to move it for them if they didn't want it. We didn't know at the time whether the buyer was a young family or not, and they basically said, "NO! Don't touch it!" So, that was a good feeling.
Overall, the build was a long, physically demanding, but fun six months out in our backyard every weekend. Using what was essentially deck hardware and deals on BORG lumber, along with a few online deals for slides and things, I ended up finishing this project for around $1200 in 2010. And for something similar, I know it would have run upward of $6000 to buy it and have it installed. Even though the boys only got to play with it for about 2 years, it was totally worth it.
One other follow-up note: I learned two valuable things about building outdoor wooden structures in Florida with this project. 1) The termites in this area are truly epic. There was a peried early in the build when I let two offcut pieces of un-treated lumber sit on the ground for a couple of days, only to find that they were literally 10% lighter from all of the termite burrows. TWO DAYS! I think the sandy fill that I used to fill in the koi pond must have been an absolute playground for the subterranian termites that were hanging out near the ponds back there. It also proved that pressure treated lumber abso-fricken-lutely works. I never had a piece of PT lumber ever show any sign of termite or other bug infestation.
The second lesson? If you want to protect outdoor wooden structures from water and sun damage in a hot, humid climate like Florida, don't use Thompsons water seal, or CVS wood preservative, or any of the other standard 'wood treatment' products. Use untinted, exterior, anti-fungal, oil-based paint. You can get it from any big box home improvement store, but you often have to talk the paint guys into selling it to you untinted. It looks sort of milky tan in the can, but it dries transparent, and gives the wood a nice warm tone without the need for stain. Applying a large amount of oil-based paint outside isn't fun, but the stuff just WORKS, and it lasted for several years. I bought an electric home power sprayer setup just for this, and the oil based paint was a royal pain in the tuchus to clean up. I was getting that stuff out of my hair for weeks afterward. But as I said, the playset stayed almost new looking for over a year, and it was still in great shape when we moved two years later. I ended up replacing the tarp 'rooves' before I had to repaint this thing.


")


. All flloors in place.")


