Beginning Main Box Joinery
Primary tabs
I haven't posted on the Tansu Teabox project in quite awhile, but I have been working on it. Slowly, as ever. But after a couple of major side-tracks in the maintenance of my basement shop, I also had problems with my website, as I've mentioned elsewhere here. But in between, I did manage to make a bit of progress on the teabox. Last December, I finally resawed the sidewall pieces to the 1/4 to 1/2" thick pieces needed for the box shell, and planed them down and joined them, then cut to final dimensions. Through all of that, I neglected to take any photos.
But after a major effort to fix the flooding problem in my shop this past year, I got my tools put back . . in particular my workbench. With the bench back, I started working on the dovetails for the teabox case.
After some significant delays the last two years due to some necessary work that had to be done on our basement, the workshop is back in working order. Most importantly, I got all of my shop equipment and benches back in place.
The main body of the teabox is made of some flame figured maple I purchased a couple years back at Peach State Lumber in Kennesaw. As I said, it's been a couple years since I did any fine joinery, so this is a good opportunity to brush up on my hand-cut dovetails.
And, since I'm so out of practice, but this will be a show piece on our kitchen counter, I'm not trying any new techniques this time. As is my habit, I cut the tails first using my Lee Valley dovetail saw, and cut out the waste with my old coping saw.
It's so nice to get back to using my marking knive and layout out some fine work.
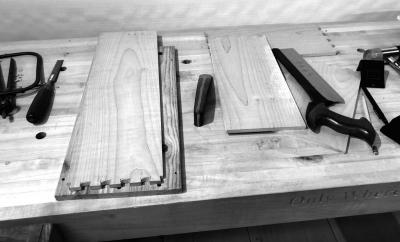
This is my first opportunity to use my Roubo bench with it's front and tail vises, and the holdfasts for surface holding.
The wood here is 3/8" thick on the case sides, and 1/4" on the inside drawer dividers. It's so nice to have a setup so perfectly configured for hand work. It's only taken me about 13 years, and five shops to get to this.
The funny thing is that with the exception of the Lie-Nielsen holdfasts, pretty much everything else I'm using here I had all the way back in my Florida house while I was building the large jewelry armoire.
OK, so, here is a close-up shot of my horrendous work cutting out the tails. I mean, I ended up doing ok with this, but it's going to be a few iterations before this stuff looks good quickly off my tools
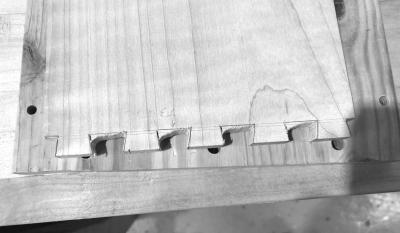
Starting with the top board (the "hero" board in motion picture parlance :-) ) I've cut the tails and pins for the top left corner, and the tails for the top right corner.

It only took me an hour or so to get to the first corner done as I knocked the rust off my skills.
I'm using an old piece of pine off of a old cabinet we inherited in one of our house moves. We used that shelving unit for a couple years, then I just took it apart and used the wood for secondary pieces on other projects. Here, I'm using it as a base to chop out the wood between the tales and pins. See . . . that's the problem with building a fancy workbench. You put so much time and effort into making it, you then refuse to let it get dinged up. What, you may ask, is the goddamned point of a workbench but to get beat up making other things??
Honestly though, I'm not that precious about my bench. It's gots work marks. Just not as many as it should at this age.
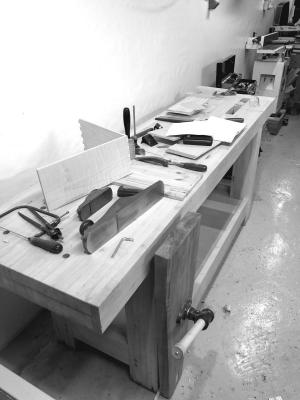
OK, so here's a shot of the workbench with the teabox in progress. I include this here so you can see the pristine white walls of my basement shop . . . now that I have water-barriers hanging from the walls. (Remember how I mentioned significant work to the basement shop? We put in a foundation line drain and sump, with plastic water barriers on the walls. The shop is dry and snug now, even through many a climate-change induced multi-day downpour as we see these days in North Georgia.
Part of the 'let it go' moments about my workbench, was seeing it for about the fourth time in 10 months in 2000 up to its ankles in water. You can see see the water damage to the feet if you look closely.
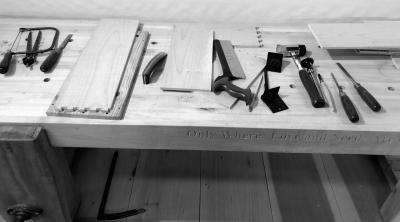
So, after getting a couple of the corners fitted, I laid out all of the case side boards, just to verify the teabox is the of the right dimensions and aspect ratio.
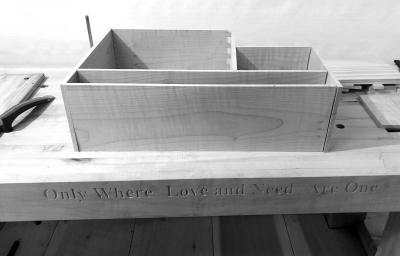
Mostly it isn't. It's bigger than I realzed. But frankly, I have a lot of tea, so, it will come in useful.
Now that I'm back in the flow of woodworking, I will be making more updates more quickly here.
In fact, a lot of other work has happened in my shop this past year. Recently I spent a ton of time on another big project, . . . 'cuz . . . you know, I can't be working on only *five* things at once.
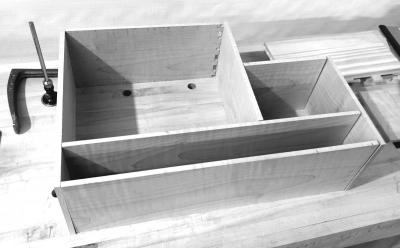
Still, here's the current state of the teabox. I'm not making predictions. But I am now able to post project updates again, and my shop is set up the way I want . . . and it no longer floods every 4 to 6 weeks. Which . . .you know . . . is helpful.
Talk to you soon with more updates.

