Chopsaw Station
Primary tabs

The second real piece of woodworking tooling I ever purchased was a 10" Delta power miter saw. It's been a trusty workhorse for more than 15 years, but I've always just plunked it on a side table, or even worse, used it on the floor. I decided several years ago that I wanted to build a chopsaw station to serve as its permanent home. AND . . . as these things usually go, it took me years to get the project started. I finally got to work on it in the summer of 2012 as I was setting up my new workshop home in the basement at the rental home in Roswell, GA.
Strangely, I decided to use melamine since I hadn't used it before. I had heard how nasty it is to work, and that certainly is true. But hey, it was cheap.
 I've seen designs with full cabinets underneath, and others with extendable arms to function as wings. I decided to use cantilevered wings instead, so I can keep more floor space clear, and also so I can add wheels to the main cabinet and make the whole thing mobile in a fairly easy way. I opted for plain old white melamine. for the case sides, but built all of the other structures from 3/4" Baltic birch plywood. To hide the edges of the cut melamine, I ripped some old poplar into strips and nailed and glued them to the front edges. All of the dimensions were basically built around the size of my miter saw. I wanted about 4 ½' of support on either side of the blade so that the center of mass of any 8 foot long stock would be supported. I planned to put glide drawers underneath for power tools and accessories, with simple doors in the front to keep dust out, and simple drawers under the two case top supports for miter saw parts.
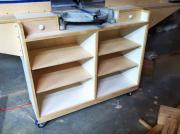
7/31/2013 - Design change. After thinking this over, I've realized that I was overdesigning this. I don't need drawers underneath on this. I want the bottom to keep out dust, so I'll just put in two fixed shelves and install doors on the front. I guess I can use those drawer glides for something else. :-)
Well, it ended up taking a year and six weeks to finish, after a strong start in which I thought i'd have it done by Halloween. It just proves that in the amateur woodshop, you have to maintain focus on individual projects. I got bored after the first flush of success and attacked about five other projects, which ended up delaying all of them.
I don't really ever want to use melamine again. It' has almost no pluses as far as I can tell, at least for a small shop doing single, custom pieces. It's heavy, fragile, blows out too easily when screwing into it, and the sawdust is nasty with wood chips and ultra-thin shards of white laminate.
 I went into this without a solid plan for how I wanted to do the inside of the case, which ended up delaying me due to indecision. It just highlights the need to think things through BEFORE you start working, no matter how sexy the first cuts of wood can seem on a new project. As I finish this, I've managed to whittle the 10 projects that were open on June 1st of this year down to only three remaining.
Other thoughts on this project? I'm pleased with how the wings and fences came out, and it has proven to be really useful. And it's a killer feature to be able to move the whole station around when I'm cutting a really long piece. The stop blocks were a refinement that I hadn't originally planned, but they work well and I love having them available.
I decided not to finish it since I already spent too much time on it, plus there's the difficulty of trying to finish the parts that are adjacent to the melamine without getting the stain or oil on the laminate. So I didn't bother.
Overall, it's wonderful to have this tool in the shop, and it's even more wonderful to finally have this albatross no longer hanging around my neck. (Now if I can remove the other three, I'll finally be back in good shape. :-)


