An Introduction

My name is Jay Oyster. By trade, I'm a manager in the IT industry, but by inclination, I'm a woodworker. This site began as a place for me to share my projects, my ideas about design, and my commentary on the world of woodworking.

Lighthouse update: Adding Screen and Coding

  • Posted on: 19 May 2023
  • By: Jay Oyster

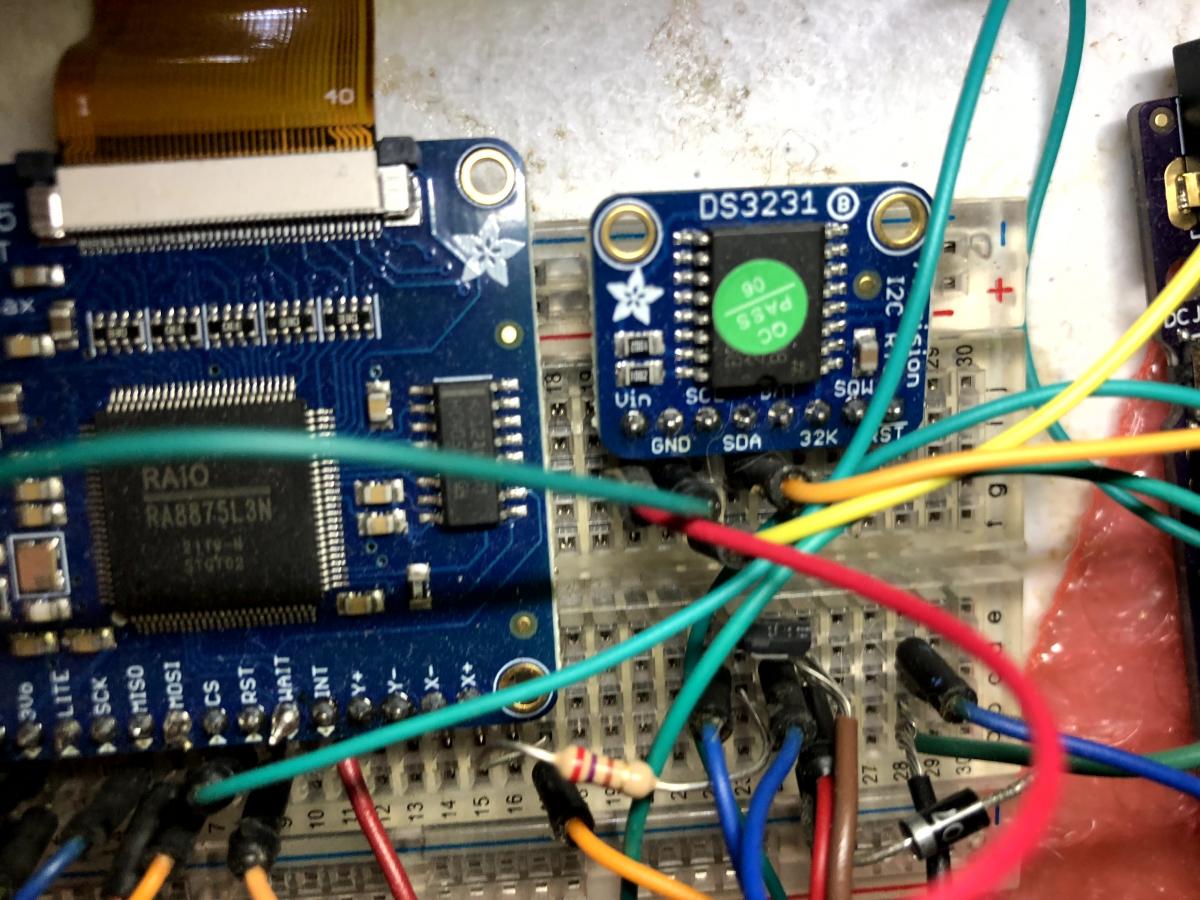
OK, to reiterate where we are in the build of this Smart Weather Lighthouse build, up to this point I had configured the sound files and sound boards to play when triggered, and powered on and loaded Circuitpython on the Metro MX  board. Up next, I'll go through how I got the 4.7" touchscreen attached and operating. And then talk about getting data back to the Metro board using the OpenWeather API, and finally, attaching the clock.

  • Configuring the sound boards, speakers and audio sample files - DONE
  • Setting up the MX board with Circuitpython and activating wifi and basic code - DONE
  • Attaching the touchscreen driver board and touchscreen to the Metro MX board - This update
  • Initializing the Openweathermap API calls for local weather data - This update
  • Attaching the realtime clock board to the Metro MX - This update
  • Building the basic touchscreen user interface
  • Wiring the lighthouse lights and motor to the Metro MX board
  • Triggering sound effects with the Metro MX Board
  • Building the wooden lighthouse base Installing the electronics into the base

Screen used: 4.3" 40-pin TFT Display - 480x272 with Touchscreen

Lighthouse update: Soundboards and MX Board Setup

  • Posted on: 17 May 2023
  • By: Jay Oyster

So far, I've described the overall idea for the smart weather lighthouse, and what the various systems of the build will be, but let me lay out the stages to this build . . . since it is a bit complicated. These are the steps I went through to pull it together:

  • Configuring the sound boards, speakers and audio sample files
  • Setting up the MX board with Circuitpython and activating wifi and basic code
  • Attaching the touchscreen driver board and touchscreen to the MX board
  • Initializing the Openweathermap API calls for local weather data
  • Attaching the realtime clock board to the MX
  • Building the basic touchscreen user interface
  • Wiring the lighthouse lights and motor to the MX board
  • Triggering sound effects with the MX Board
  • Building the wooden lighthouse base
  • Installing the electronics into the base

I have to say that I couldn't have pulled together all of the electonics and coding without the excellent support of the Adafruit projects and learning pages.

Adafruit Soundboard FX board with headers and speaker terminals

Challenge Coin Display Stand

Challenge coin display stand in poplar with walnut stain
This is not a complicated project, but I found it rewarding.  Last year, my sister asked if I could make a challenge coin display. Now, I had no idea what a 'challenge coin' was, so I had to do some research. She gave me a starting point. She had seen such a display on the TV show 'Criminal Minds'. She gave me a season and episode number, so I went out and bought that episode on Amazon Prime. (It wasn't available on any of the streaming services I have.)  In Season 7, Episode 18,  a challenge coin plays an important role in the plot, and display is shown on someone's desk at 42:25 into the show. Challenge coins are used, often by military units or for particular military milestones, to indicate membership in a rare group that has accomplished something difficult. They're also used by some other groups as a sign of membership, such as industry or affiliations.  My sister and her husband had acquired a few over the years related to fan conventions, and they wanted some way to display them.The example shown in the episode is a single board with slots on top for each coin, in a single row. I gather that would not be large enough for the number of coins they have. So they asked for a tiered stand.

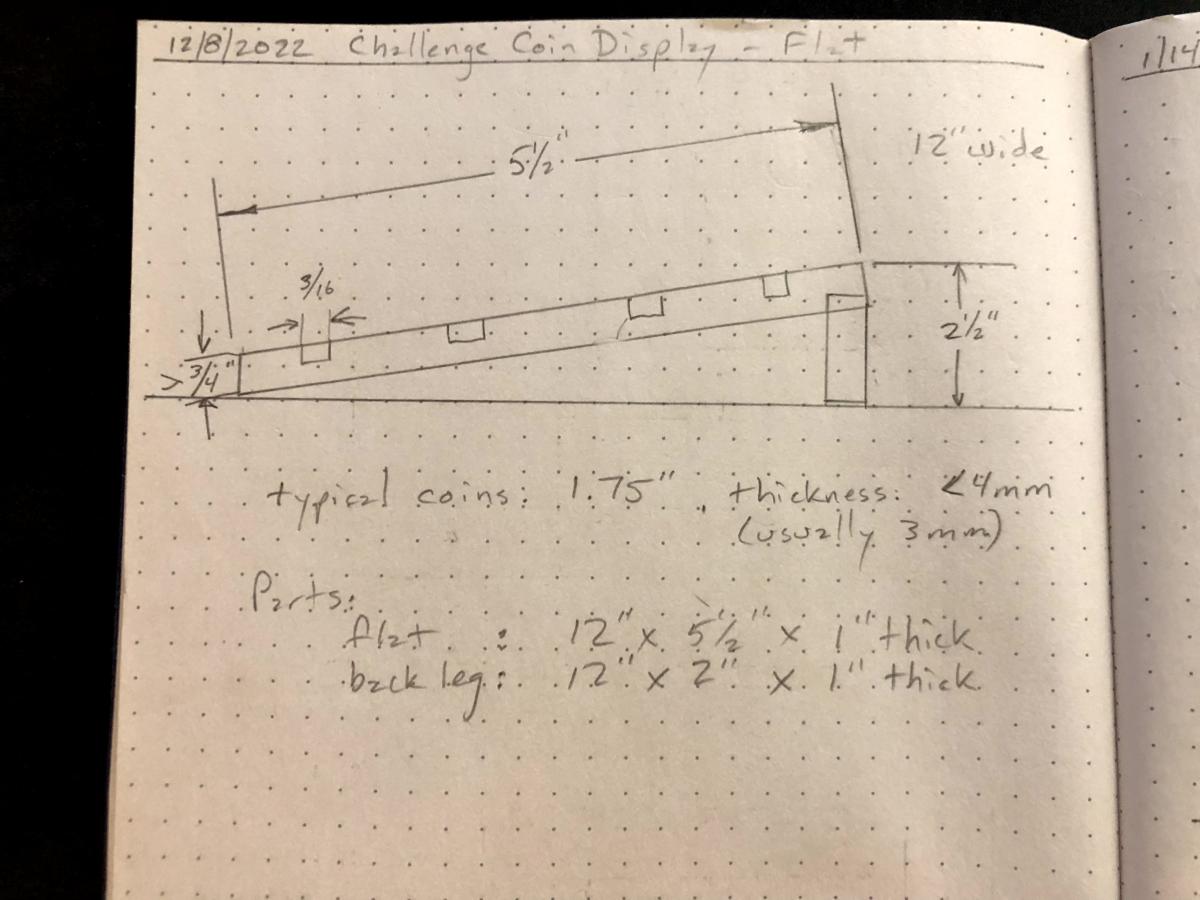
I started off as I have typically done lately by opening up a gridded notebook and making some drawings. I needed to understand the typical sizes of these coins, and how many could be places in a certain area. I understand the coins are made by several companies and are usually of very high quality, including fine metals, engraving, enameling, and while many are round, some are odd shapes. So I needed to accomodate a variety of potential coin types.

Most coins are between and 3 and 4 mm in thickness, and around 4.5 to 6 cm in diameter.  (1.75" - 2.0")

I opted for a simple board tray with multiple row slots for the coins, and a riser mounted at the back to lift it to create tiers. Overall, it was going to be about 12" wide, 6" deep, and about 2 1/2" tall. (30cm x 15cm x 6cm)

StartDate: 
Thursday, September 1, 2022 to Saturday, December 10, 2022
Finished project?: 
Yes

Lighthouse update: Block Diagram and Prototyping

  • Posted on: 3 May 2023
  • By: Jay Oyster

OK, thinking back to the beginning of this effort in January and February, I had a basic idea of what I wanted to accomplish in this build. First, I wanted the lighthouse itself to look pretty-much stock, as designed by Lego. I just want it to function with more autonomy.

Block diagram of the electronics

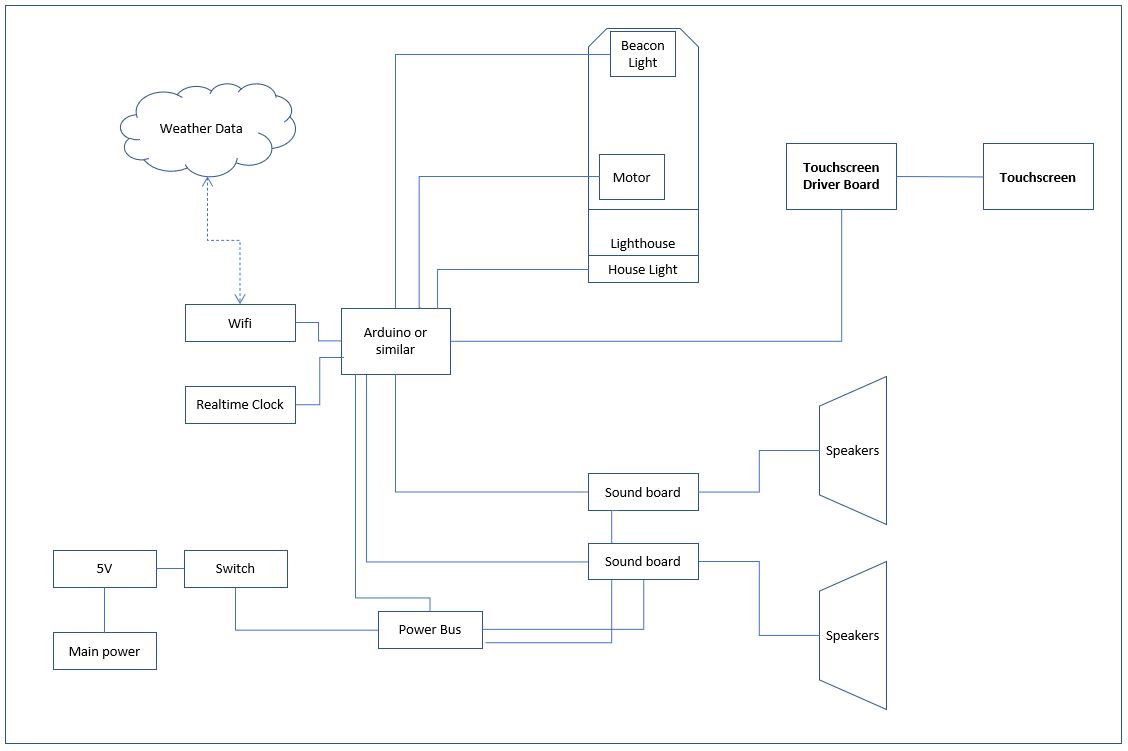
Basic design of the lighthouse automation systemSo starting with a basic set of functions and I how I saw it coming together initially . . . this is not that different from what I ended up building. Here are the basic components:

Prototyping the electronics for the updated lighthouse

Weather Smart Lego Lighthouse

The basic Lego Lighthouse kit on our kitchen table, awaiting . . . magic
As the father of two sons, I'm required by international law to be into Lego.  And of course after my boys lost interest, I had to go on and build 'adult' Lego sets. Not so much required by law, but strongly encouraged by The Lego Group, plc.So, last Christmas, as a request, I received the Lego Motorized Lighthouse set. This is, to say the least, an extremely cool, and as the title says, motorized, lighthouse kit. I managed to  hold off on finishing the build for 24 WHOLE hours. But once finished, I added batteries, turned on the switch, turned off the lights in the room, and watched the beacon light sweep around the room, with a warm gentle fireplace light showing in the little house. To say I was smitten is to understate the patently obvious.But then . . . and here come the words that any engineer will tell you are the most dangerous in the world . . . . I got to thinking . . . 

For the moment, this is a placeholder until I can add the updates. I've moved very fast on this project, and only a little bit of it is woodworking related. Otherwise it's Lego, electronics, interface design, sound design, and python programming. I'll start with the wish list:

The motorized lighthouse is cool and all . . . but I want it to do more. I made the mistake of, the second night while showing it to my wife, opening my phone, finding a lighthouse sound effects video on Youtube, and played that in the background. Even she got goosebumps. So I wanted it to do more:

  • Sound effects . . . obviously
  • Timer function to turn it on and off
  • A foghorn . . because DUH, obviously.
  • Oh, and the foghorn has to turn on when it's foggy out.
  • And it has to lose the batteries, so I need it to plug in and run all the time
  • And it can't have an attached computer, so I need a way to control the thing

See . . . . nothing much. Just a standalone lighthouse toy that looks, sounds, and acts like a real automated lighthouse with foghorn.

Sounds  a bit mad.    But ya know what . .  .I've BUILT it. And it is AWESOME!

Much more to come.

StartDate: 
Friday, February 17, 2023
Finished project?: 
No

Beginning Main Box Joinery

  • Posted on: 10 April 2023
  • By: Jay Oyster

I haven't posted on the Tansu Teabox project in quite awhile, but I have been working on it. Slowly, as ever. But after a couple of major side-tracks in the maintenance of my basement shop, I also had problems with my website, as I've mentioned elsewhere here. But in between, I did manage to make a bit of progress on the teabox. Last December, I finally resawed the sidewall pieces to the 1/4 to 1/2" thick pieces needed for the box shell, and planed them down and joined them, then cut to final dimensions.  Through all of that, I neglected to take any photos. 

But after a major effort to fix the flooding problem in my shop this past year, I got my tools put back . .  in particular my workbench. With the bench back, I started working on the dovetails for the teabox case.

Cutting dovetails of the main box case

Pages