Weather Smart Lego Lighthouse

The basic Lego Lighthouse kit on our kitchen table, awaiting . . . magic
As the father of two sons, I'm required by international law to be into Lego.  And of course after my boys lost interest, I had to go on and build 'adult' Lego sets. Not so much required by law, but strongly encouraged by The Lego Group, plc.So, last Christmas, as a request, I received the Lego Motorized Lighthouse set. This is, to say the least, an extremely cool, and as the title says, motorized, lighthouse kit. I managed to  hold off on finishing the build for 24 WHOLE hours. But once finished, I added batteries, turned on the switch, turned off the lights in the room, and watched the beacon light sweep around the room, with a warm gentle fireplace light showing in the little house. To say I was smitten is to understate the patently obvious.But then . . . and here come the words that any engineer will tell you are the most dangerous in the world . . . . I got to thinking . . . 

For the moment, this is a placeholder until I can add the updates. I've moved very fast on this project, and only a little bit of it is woodworking related. Otherwise it's Lego, electronics, interface design, sound design, and python programming. I'll start with the wish list:

The motorized lighthouse is cool and all . . . but I want it to do more. I made the mistake of, the second night while showing it to my wife, opening my phone, finding a lighthouse sound effects video on Youtube, and played that in the background. Even she got goosebumps. So I wanted it to do more:

  • Sound effects . . . obviously
  • Timer function to turn it on and off
  • A foghorn . . because DUH, obviously.
  • Oh, and the foghorn has to turn on when it's foggy out.
  • And it has to lose the batteries, so I need it to plug in and run all the time
  • And it can't have an attached computer, so I need a way to control the thing

See . . . . nothing much. Just a standalone lighthouse toy that looks, sounds, and acts like a real automated lighthouse with foghorn.

Sounds  a bit mad.    But ya know what . .  .I've BUILT it. And it is AWESOME!

Much more to come.

StartDate: 
Friday, February 17, 2023 to Wednesday, May 31, 2023
Finished project?: 
Yes

Beginning Main Box Joinery

  • Posted on: 10 April 2023
  • By: Jay Oyster

I haven't posted on the Tansu Teabox project in quite awhile, but I have been working on it. Slowly, as ever. But after a couple of major side-tracks in the maintenance of my basement shop, I also had problems with my website, as I've mentioned elsewhere here. But in between, I did manage to make a bit of progress on the teabox. Last December, I finally resawed the sidewall pieces to the 1/4 to 1/2" thick pieces needed for the box shell, and planed them down and joined them, then cut to final dimensions.  Through all of that, I neglected to take any photos. 

But after a major effort to fix the flooding problem in my shop this past year, I got my tools put back . .  in particular my workbench. With the bench back, I started working on the dovetails for the teabox case.

Cutting dovetails of the main box case

Enough --- I have to reclaim this site

  • Posted on: 9 April 2023
  • By: Jay Oyster

OK, there are clearly theme problems with the Drupal site I've been running. And my version of Drupal is old enough that migrating is a major undertaking. I refuse to migrate to Wordpress or Joomla or SquareSpace or Wix. I'm just going to downgrade the current site to get the basics of what I want out of this hosting/publishing function. I have many projects that I've not published here because of the problems with the underlying tech. No more. I'll just go back to a simple layout and keep the old content as is.Coming soon . . . 

Fixes to the site continue

  • Posted on: 10 December 2022
  • By: Jay Oyster

Well, I'm still getting errors on the website, mostly related to a theme file I used to build it. I'm on Drupal 7, and unfortunately my understanding is that a) I need to upgrade to v9, but that is across a major chasm of changes, and b) the most painful of the changes is that most of the themes, and particularly the one I use, WILL break.

Anyway, I've patched what I can in v7 on my site and still have error messages. The ironic thing is that nothing is broken. I'm just getting error messages. (I mean, sure, something *is* broken, but none of it is preventing me from doing anything on this site. And since I don't let anyone else log in, I'm the only one that matters on the creative side. :-)  ) 

The quandary now is that I have about a year of small and medium projects to add to the site, along with updates to some of my ongoing long term projects. Do I add them now and risk them not surviving the migration to Drupal 9?  No, I won't do that. I'll update status here as I'm working on this, but I'm holding off on my project and shop updates until I get this thing updated.

The bottom line, you may see this site go completely off-the-rails at some point as I'm working to fix things. It makes no sense for me to have a full, offline Dev and Test instance, so I will be fixing in Production . . . so to speak. My professional IT self shudders at the thought. But them's the realities.

Wish me luck!


Still Around

  • Posted on: 1 December 2022
  • By: Jay Oyster
Work continues . . . but catching up on website updates

I'm still around. It's just been a busy year.   A quick summary and catch-up-to-speed on things . . . and some notes on this website.

I'm still around. It's just been a busy year. I've switched jobs and finally have a bit of time to myself to breathe. Working for E*Trade was nice. When E*Trade was bought by Morgan Stanley . . . it was different. Mostly, the people are nice. The organization has a tendency toward patronizing behavior. That's toward both employees and customers. And the need to work both for E*Trade goals and Morgan Stanley bureaucracy was, frankly, overwhelming. So I quit.

But this site isn't about my professional life . . . much. It's about my hobbies and woodworking and privately-held opinions.

So, I have done some woodworking in between things this past year. I just haven't had time to update the website. As you may also see from some errors showing up on the site itself . . . I have some maintenance to do.

I plan to keep the site around forever. It's where I can say whatever I like. (Although I am finding Mastadon to be awesome as well . . . but this is where I can publish things and keep them around as long as *I* like. So I will. I just need to bring it up to speed and fix a couple minor issues. 

Oh, and I have some great woodworking and shop updates to get documented and put out here. I'll get it done soon.


Tansu Teabox: Basic dimensions and cutting raw parts

  • Posted on: 22 November 2021
  • By: Jay Oyster

For the teabox, I laid out a basic step-style tansu cabinet layout, with 10 drawers and two doors, and space at the top right where I can put a couple of steeping tea cups.

So the dimensions I started with to determine what size to make the teabox were the two Adagio tea infuser mugs, similar to this.  Each of these is about 3 1/2" wide and 5" tall, with the infuser and glass top  in place. I decided to use the top step of the box, on the right side, as a place to store these two mugs. So a 5" step down from the top height. 

The overall box height is limited by cabinets in our kitchen. That's 16" of space. 

The width needs to fit in with the rest of our counter items. I decided to go a bit wide, so 20". It'll be a focal piece in our kitchen.

In terms of depth, I wanted the drawers to be functional, not bottomless cubbies I couldn't reach the back of. I thought between 5" and 7" deep. So I split the difference and decided on a 6" deep box.

Labels for the parts list

Tansu Teabox

Starting on the teabox dovetail joinery
A small counter-top box, inspired by Matt Kenney's 52 Boxes in 52 Weeks project, and my appreciation for Japanese Tansu chests.  Intended to store loose leaf tea and the tools and vessels used to make it.

I've been wanting to build a small project again, but something nice. Something with some challenging joinery and some nice wood. But not too large.

I was inspired by Matt Kenney's "52 Boxes in 52 Weeks" project. I happened across it during a podcast, I think. Probably the Fine Woodworking podcast, and in one of those rare instances where I was motivated enough by a podcast discussion to actually open a browser and *type in a search phrase*, I found Kenney's MEK Woodworking website. Not only did I like the boxes, but I love the web design. 

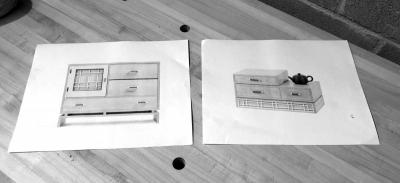
A couple of the boxes later in the year are naturally tansu-like. Since the author also seemed to be interested during that same year in learning about Kumiko, or the art of wood screen making, several boxes have kumiko added as design elements. Box 2Box 39Box 45, and Box 51 all spoke to me on an id-type level. While thinking about the need to build a tea box for our kitchen, I remembered boxes 45 and 51, in particular. Those became the design inspiration for my latest project.

MEK Woodworks boxes 45 and 51 were the design points I wanted to reference for my teaboxI drink tea. I don't drink coffee. At this place, in this time, announcing a preference for tea over coffee has the impact of making me as appealing to be around as a leper in the Bible. All I'd have to do is mention that I can't stand the NFL, and my favorite flavor of ice cream is vanilla to have the majority of my fellow Americans shun me and shame me. Mostly, though, they just look at me in vague disgust and confusion. Like trying to understand a sea cucumber. Anyway . . . I like tea. And in fact, I like serious tea. You know, the kind you brew loose leaf in a steeping tea pot or an infuser. And I've got lots of different teas . . . in glass jars and pouches and metal containers in our pantry. I need someplace to put the tea, and the paraphernalia. It's a weakness . . . thank you Adagio, you marketing maestros.

Drawings of key dimensions and the overall layout of the drawers
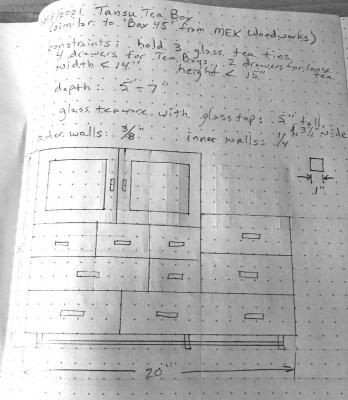
I started by measuring my favorite Adagio steaping tea cups, and the glass jars I use to store my favorite teas in. And I built around that, as well as the dimensions available on our kitchen counter top. It had be less than 15 inches tall, and not too deep, so it wouldn't take over too much of our counter space. I'll put it into Sketchup eventually, but I started out with a simple gridded sketch pad I was gifted last year and drew what I had in mind.

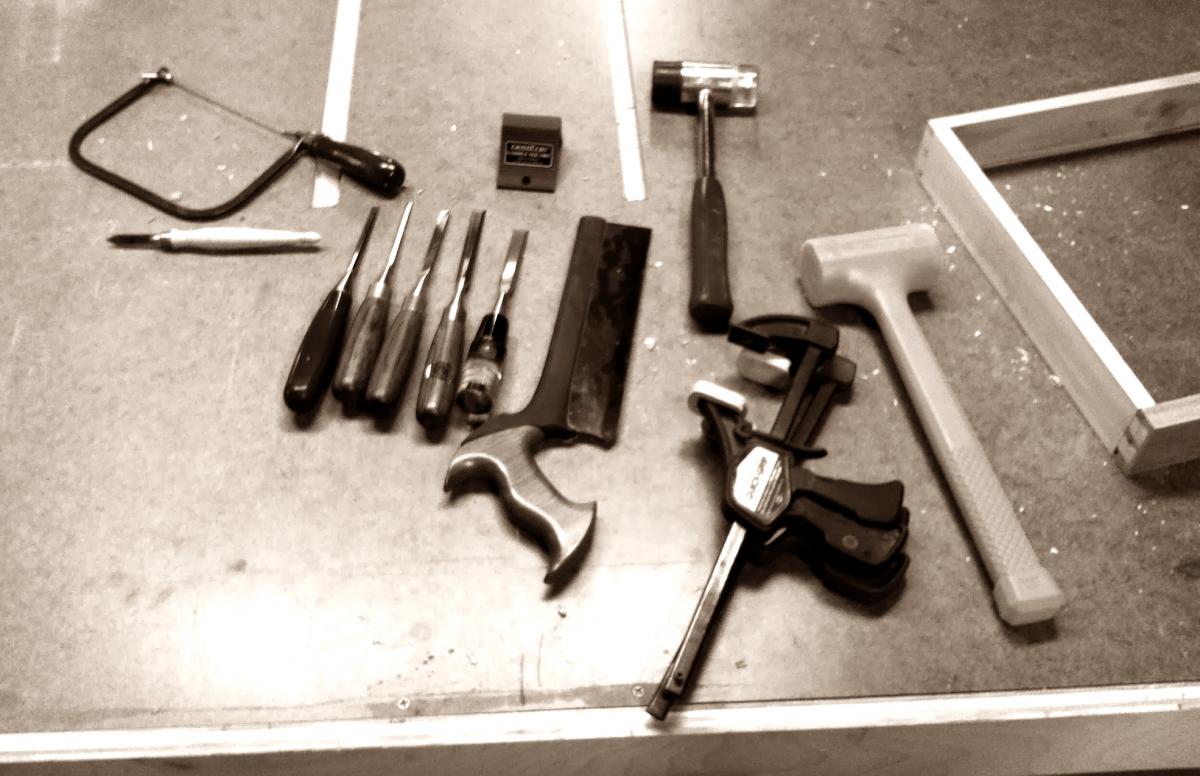
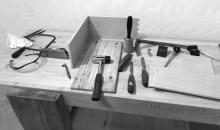
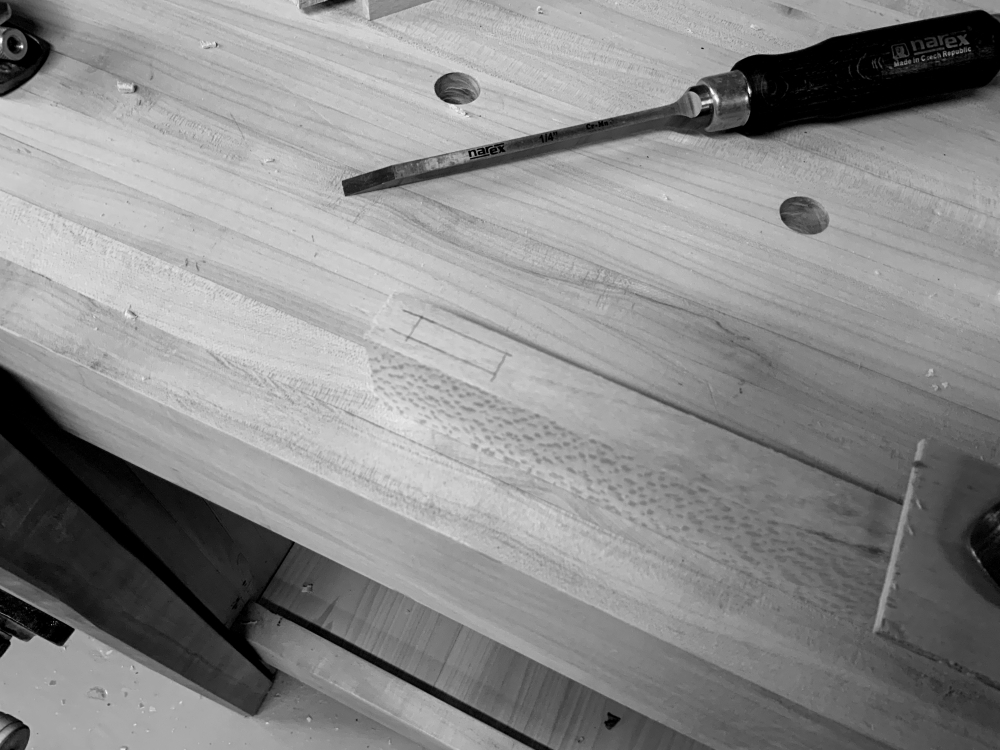
Over the next few weeks, this is what I'm going to work on. My goal with this is to finish it fairly quickly. I'm over the multi-year projects. 


StartDate: 
Saturday, November 6, 2021
Finished project?: 
No

Finishing side doors and adding hinges

  • Posted on: 12 October 2020
  • By: Jay Oyster

Cutting recess to house side hingesCompressing a bit of the work here. I built the side doors, mortise and tenon corner joints (See photo), routed grooves for the panel. I glued up the center panel of 100% quarter-sawn sycamore. Finding clear, white pieces of sycamore among the remaining stock I had was a big challenge. In the end, I managed to get a clear face on one side for the outsides of the door. I debated what to do about the inside of each door. Finally, I opted to use some of the washi (Shoji screen paper) I had ordered for the front door, and taped in down at the edges on the inside of the door, covering the panel. I'll show photos of that on the completed project.

But up next was mounting the side doors. I ordered two pair of the smaller 1 1/4" tall Brusso (CB-302) butt hinges. Damn they're expensive.  And I suppose that they're worth it, but it is such a premium these days to support American manufacturers. I did take some photos of the process as I cut the shallow mortises to house the hinges on the doors. Rather than a router, I just used some newly sharpened chisels and cut them out by hand. 

Pages